I cut out a couple of 6" letters from 1/8" pvc and used scrap 3/16 foam board for backer instead of coroplast and it worked pretty good too
thanks again Brady for sharing a great way to hold parts

 Member
I cut out a couple of 6" letters from 1/8" pvc and used scrap 3/16 foam board for backer instead of coroplast and it worked pretty good too
thanks again Brady for sharing a great way to hold parts
 Senior Member
I can cut sintra and dibond most of the time with just vacuum. using a 1/8" straight bit the shavings will keep the piece in place. acrylic and lexan don't work as well.
 Senior Member
No problem guys.
Hey - If you guys have the chance, can you post up a few pics of what you are cutting here? I think that it would be of help to all to see a visual of what the process entails. Nobody cares if they are crappy...and if your shop is a mess. Pics...
I swear I took pics of a really tightly nested sheet of acrylic parts that I did...but who knows where they wound up. Anyway, here's a pic of me laying up the tapes:
Towards the bottom of the sheet, you can see the two 24" widths of transfer tape that were applied to 3/16" Acrylite. I left the Acrylite paper protectant intact. Then towards the top, you can see where I've run the 6" mounting tape. The roll of 6" is sitting on top of the waxy mounting tape backer paper. I leave about 1/4" in between 'tracks' to keep me from overlapping the tape. Care must be taken when applying the mounting tape because it grabs hard enough to pull up the transfer tape if you start pulling it the wrong way.
-B
High Definition 3D Laser Scanning Services - Advanced ShopBot CNC Training and Consultation - Vectric Custom Video Training IBILD.com
Senior Member
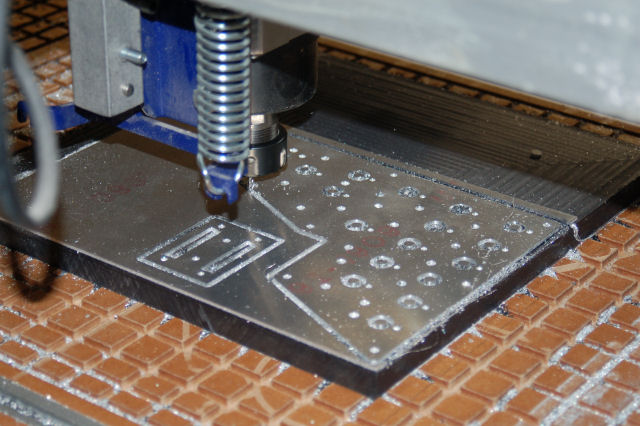
Here's an example of something I did that's very similar to the method Brady uses:
This photo shows me cutting a control panel & connector bracket out of .062 6061-T6 aluminum. Instead of using tapes to hold it in place, I sprayed the black base (UHMW) and the aluminum with Wilsonart formica spray adhesive. I let it sit for 30 seconds or so (I don't recall the exact time, I just followed the instructions on the can) and then mated the parts and hit it with a J-roller for a few minutes.
The metal parts popped right off with a little effort from a flat bladed screwdriver and cleaned up quickly with some Simple Orange.
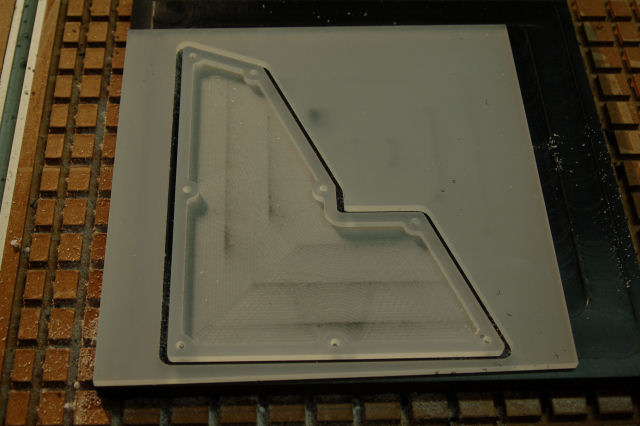
The UHMW base is held in place by vac - there's a rubber gasket in my plenum that you can't see. I also used my spoil-board cutter on the plastic before I glued it up - I didn't want to cut that deeply into it. However, next time I'm going to try the coroplast trick. It looks to be much more economical than using my UHMW scraps. *laughs*
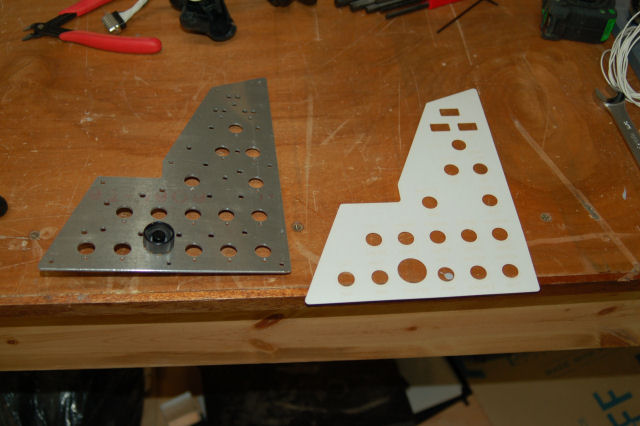
Here's a pic of the finished panel if you're curious:
The white paper is a laser cut version of the final acrylic edge-lit panel.
That was also cut using the same spray adhesive method:
g.
Member
I'd like to ask for some advice on this technique please. I need to cut a bunch of small (7" +/- long, and tapered from 3/4" wide down to 1/4", think small triangle) parts in 3/16" thick polycarbonate sheet.
My supplier only has the PC sheet with "cling" film to protect it, not the sticky paper like acrylic. And, I am afraid acrylic is too brittle for the application. Has anyone tried sticking the wide transfer tape directly to the polycarb, then gluing that to the corplast? I am set up for spraying contact cement, so I planned to go that route. Will the tape hold the parts and release them OK? Will the contact hold the back side of the tape? I don't have the double sided stuff.
I plan on cutting with an Onsrud single flute at 2" per sec, probably offsetting the first cut and then doing a .025 clean up pass. There are a few tight curved areas, so I might path those separately and go a little slower (rpm and feed). I need a very good finish (flame polish???) since it's for a display. Any thoughts are appreciated!
Kind Regards.
Senior Member
Gene - Looks great. The only thing I would add is a 1/4" or wider 'island' in the center of the vac pocket you have machined there to prevent the material from cupping down when under vacuum.
Ed - You should have no problem cutting those parts with transfer tape right on the acrylic. It is a bit tricky to get a nice smooth lamination because the transfer tape really sticks to the acrylic's ultra smooth surface. It peels off easily though.
Experiment with the transfer tape & your brand of contact adhesive on scrap before you try it on the real deal. I don't see it being a problem as the transfer tape should act as a barrier for the cement bleeding thru. Acrylics are sensitive to many solvents - which *may* be flashing off of the contact adhesive...Test it to be sure.
I would cut these small parts in 2 passes with a single spiral-O flute at 1,0.5 with ramped entry at 18,000 RPM or a double or triple spiral-o flute up to 2 IPS, if the cutter diameter is at least 1/4". Test 1st few to dial it in & adjust accordingly. You may be able to get away with a single pass, but you'll have to test to be sure. No two acrylics cut the same...and color can greatly affect cutting speeds. Check it: http://www.plasticrouting.com
-B
High Definition 3D Laser Scanning Services - Advanced ShopBot CNC Training and Consultation - Vectric Custom Video Training IBILD.com
Member
Thanks Brady!
Tracy Spitulski
KenCraft Co Inc.
PRSa 6096
www.kencraftcompany.com
Hardwood Lumber, Custom Millwork
Dust Collector Fittings
Member
Hey Brady,
I'll say "thanks" as well. I got to try it today (prototypes) and only one part lifted during the cut, and it was the part nearest the edge. Again, I'm cutting polycarbonate (Lexan), and my cut quality was poor. A lot of chatter marks. I may try again tomorrow and go slower.
The tool diameter is only 1/8" for some tight areas I need to cut, and 3/16 for the majority of the cut. I am using arc/mm for the post. What is interesting is the portion of the cut that is truly a straight cut (in X) doesn't look too bad. But the sloped cut (third side of the triangle) or wherever there are curved areas, the cut is very "bumpy." I wonder if it is chatter or resolution. And unfortunately, I was aiming to make it more curvy because to straight section looked too boring. Again, this is an Alpha and spindle, and the part was designed in A'cad LT and imported into Insignia. Any ideas as to improved cuts?
Thanks again in advance for any suggestions!
Senior Member
With a finishing passe.Originally Posted by woodturner

Member
Hello Paco,
I should have said, it was with a finish pass. My first pass left approximately .040 thickness from the bottom and .020 from the profile. The "finish" pass was at full depth and (theoretically) cut only .020 from the part. Again, way too many marks. Could it be poor circular interpolation? I thought the alpha using the arc/mm post performed that alright. It looks like the proverbial mini X and Y steps to cut an angle or curve. Any suggestions as far as settings to change for cleaner cuts?
Thanks in advance!
 Posting Permissions

 Reply With Quote