Page 1 of 3 123 LastLast
Results 1 to 10 of 28

Thread: I am soooo disappointed!

  1. #1
    Join Date
    Jun 2013
    Location
    Pasadena, CA
    Posts
    986

    Default I am soooo disappointed!

    So, this post is not about getting advice. I know what my stupid mistake is.

    But here are a few pictures of an almost nice project and how I screwed it up. Any consolation is welcome

    The task was to take up Bob Eustaches' idea of making "invisible" wood hinges with glued-in dowels, but machining the whole hinge out of solid wood. The outcome would be a kind of pill box from Myrtlewood with several compartments. To make it pretty, the lid was to be adorned with a Cherry inlay.

    So, this is the blank for the lid with inlay. Not perfect with a few chipped out inlay spots but acceptable.


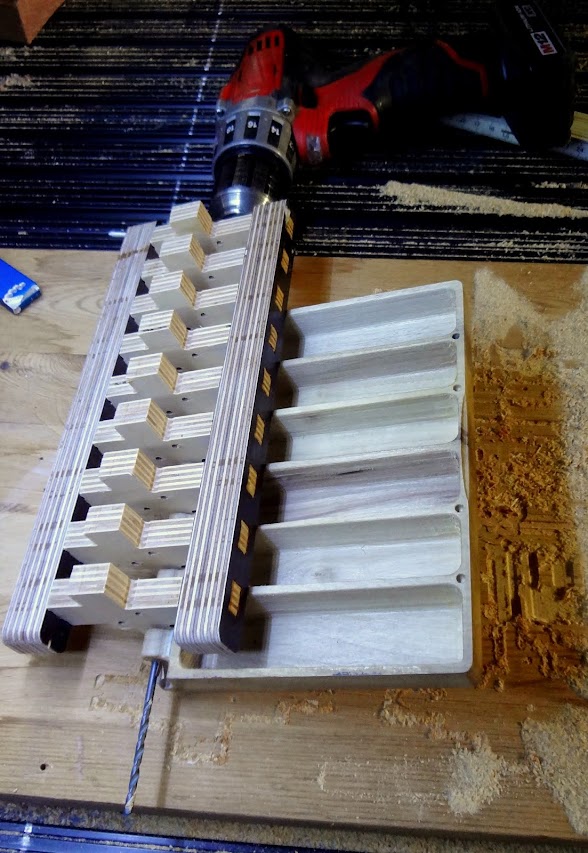
    Unfortunately I forgot to take pictures of the bottom and top with the hinges before assembly but this is the drill jig that I made to get the holes aligned.


    This is the bottom of the pill box with the drill jig and drill still in place. For the photo I removed the clamps that held the jig in place.


    More pictures of my sad story to come......

  2. #2
    Join Date
    Jun 2013
    Location
    Pasadena, CA
    Posts
    986

    Default

    After drilling the bottom and the top I jammed an 1/8" brass rod through the holes. That was the beginning of trouble. Since the drill bit was also 1/8" there was a lot of friction but I got it in, after all. I should have better used a 3mm rod to give it some clearance.


    But, the box even opened, albeit with some resistance. Inside is not sanded and finished yet.


    Finally I had the dumb idea to hold the brass rod in place with a droplet of CA glue on the outside. But when I put the glue bottle tip to the rod it gushed out a good squirt and glued part of the top hinge to the bottom. At the next opening attempt it broke the hinge. C-R-A-P.


    Oh well. I think I have some of that pretty Myrtlewood left and will try again. Live and Learn. I will also change the grain direction to the long dimension to reduce the warp after machining.

  3. #3
    Join Date
    Nov 2013
    Location
    Tyler, TX
    Posts
    141

    Default

    looks very nice

    you should be able to glue the joint back together just glue and clamp it for 24 hours.

    I have had to fix several projects that way

    I use titebond 3 wood glue

  4. #4
    Join Date
    Jun 2011
    Location
    Melbourne, Australia
    Posts
    1,010

    Default

    What a bummer Gert - my crappy instructions! You have imitated the Incra Hinge Crafter perfectly. The pics here of the almost invisible hinge are of my initial tests, so the timber is crazy thick. The hinge is a piece of 1/4 dowel with a 1/16 drilled hole each end. Five pieces seem to work well. I think you mentioned you didn't have a lathe?? You need a jig to drill the hole central - that's the aluminium bit in the pics. You do need another jig to ensure that the dowels are cut off square. The dowel does need to be round or you get binding. This hinge is truly amazing and if the dowel/lid/back are the same species you just wont see it from the back with the lid closed. With the lid open it looks really good. Works best with a recessed lid like on the Paradise Box.
    Attached Images Attached Images
    Buddy BT48 with 6' power stick
    2.2 HSD Spindle
    Aspire 9.5
    6" ShopBot Indexer

  5. #5
    Join Date
    Apr 2013
    Location
    Kennebunkport, Maine
    Posts
    4,420

    Default

    OH! Gert! Looked Soooo close
    Wonder why so many things screw up at the very last second? Like putting a USB in when it's dark is supposed to be a 50/50 chance----NOT!!
    Keep trying-- MUCH better look
    scott P.
    2013 Desktop/spindle/VCP 11.5**
    Maine

  6. #6
    Join Date
    Mar 2006
    Posts
    7,832

    Default

    Oh man......you really screwed that one up!I would offer words of consolation but this is more fun
    Actually that is alot of nice work and a shame you had a problem
    Words of Wisdom:
    “Words that sink into your ears are whispered…… not yelled”
    “The biggest trouble maker you’ll probably ever have to deal with, watches you from the mirror every morn’n”
    “The only difference between a rut and a grave is the depth”
    -----------
    Just remember...when it's time for the hearse to pull up..there's no luggage rack on top!
    -----------
    The beauty of the Second Amendment is that it will not be needed until they try to take it...Thomas Jefferson

  7. #7
    Join Date
    Jun 2014
    Location
    Houghton Lake MI
    Posts
    163

    Default

    Very nice work , hate to see someone else has my luck ! Great idea . Jeff
    Jeff King
    shopbot buddy BT-32
    P/C - 3.25 hp

    The things I make may be for others ,
    but how I make them is for me . T. Konovaloff

  8. #8
    Join Date
    Apr 1999
    Location
    Rock Hill SC
    Posts
    500

    Default

    I know a lot of your guys know this but for those of you that dont here it is.

    A screw or bolt is undersize. Usually about .003. That way it will go into the named hole. A 1/2 inch bolt will measure out .497 or thereabouts.

    To accommodate this you have letter drills and number drills. One will provide a hole just over the nominal size and one will provide a hole just under. Sitting here at the computer I can't remember just which is which.

    A drill will never drill the exact size it is sharpened to. It will always drill oversize and out of round just because of the geometry of it. The only way to get an exact size and a round hole is to drill undersize and use a reamer for the final pass.

    In your case you had a rod of .125. You should have drilled the hole with a .128 bit. These are cheap and available because the 1/8 inch rivet used in aircraft work requires them. I used to buy them by the dozen and pitch them when they were dull rather than try to sharpen them.

    On the wall of my shop is a large poster with all of the numerical, number, and letter drills in order. They used to give these away but now they sell them for about three bucks. Try WT Tool on the web.

  9. #9
    Join Date
    Jun 2013
    Location
    Pasadena, CA
    Posts
    986

    Default

    Quote Originally Posted by tlempicke View Post
    .....A drill will never drill the exact size it is sharpened to. It will always drill oversize and out of round just because of the geometry of it. ..........In your case you had a rod of .125. You should have drilled the hole with a .128 bit. These are cheap and available because the 1/8 inch rivet used in aircraft work requires them. ...........
    Yes, that would have been a good idea but I just used what I had at hand. For that technique, I needed a drill that is at least 8" long. While you can get such a long drill in 1/8 everywhere I did not see slightly bigger ones. Next step up was 3/16 and no smaller ones at all.

    Lessons learned for the next attempt:
    - change wood grain parallel to the hinge (avoid hinge warping)
    - change individual hinge barrel length from 1/2" to 1"
    - try inserting a piece of vertically oriented wood into each barrel to strengthen
    - change pin wire diameter to 0.08"
    - make own long drill 0.094" from drill rod.
    - probably change to maple for the body. That myrtle tends to splinter.
    - stay away from the CA glue bottle

  10. #10
    Join Date
    Jun 2013
    Location
    Pasadena, CA
    Posts
    986

    Default

    Quote Originally Posted by Bob Eustace View Post
    What a bummer Gert - my crappy instructions! .......
    Oh no, perfect instructions. I just chose not to follow and instead of making the hinge barrels separately from a dowel and glueing just to cut them from the same solid board in one process. Technically this should be the same except for the need of a very long drill with jig to keep it properly in line. But hey, it was a first try. Should have practiced with scrap wood.

Posting Permissions

  • You may not post new threads
  • You may not post replies
  • You may not post attachments
  • You may not edit your posts
  •