No, just off-the-shelf carnauba polish, rubbed in with a rag:Originally Posted by scottp55


 Senior Member
No, just off-the-shelf carnauba polish, rubbed in with a rag:
 Senior Member
G, it looks like it could be Myrtle wood. See it often in northern California and Oregon. Beautiful stuff! I brought home a large bowl blank several years ago and I had to sit on my lathe to keep it from bouncing across the floor while I roughed it out.
Nice work there!
Scott
Senior Member
Still undecided about the wood. I have some myrtlewood pieces that look similar, but with more open grain and maybe not as hard. Not sure about olive with the color but who knows...
In the meantime I bought an extra long ballnose bit to make deeper bowls and boxes with this method. Got a real good deal for a 6" long 1/2" diameter bit with 3" long flutes. Got it from Toolmexonline on eBay for $37, not too bad for such a massive bit, even TiAlN coated. Made in India.....

Senior Member
First attempt at trying to use this extra long ball end mill. Works pretty good but I noticed I need to change the cutting strategy for vertical walls. When cutting a deep slot (the top section of the inner surface) such a long bit starts to chatter like crazy, especially when working at 45 degrees angle to the grain (this is pretty soft western cedar). I suppose the flutes engaging with the wood fibers make the whole bit bounce between the channel walls. Once the bit has some clearance it works just fine.
Anyway, this is a test piece, intended to be a mold for dough rising. 12" long, 3" wide and 3" deep with 3/16" wall (for Scott: yes I am still consuming that cedar fence post).
I am getting quite proficient at making disposable vacuum pods.

 Senior Member
Nicest fence post I've seen in a while
scott P.
2013 Desktop/spindle/VCP 11.5**
Maine
 Senior Member
Get together with Joe, I believe he might still have some extra post holes to go with those 'fence' posts!
Great job and thanks for the tip on the bit I need a bit just like that for an upcoming project.
As far as chatter goes what if you hogged out the piece with a regular end mill and then used the new bit as the 'finish' bit. Would that help with the chatter maybe? Don't know but I will be ordering that bit, thanks. Russ
AKA: Da Train Guy
 Senior Member
Hey Russ-I don't think Gert's been around long enough to know about Joe's special on post holes!
Gert, I would definitely rough most of it out with a different bit as Russ suggests. A Vortex chip breaker end mill would blow you away with what it does on that.
Senior Member
Ha, had to go back to 2008 to find the post holes threads. Too bad such a quality product is no longer available. No wonder with all the Chinese imports nowadays.
But it is true I did not have not CNC on my mind back then.
As for my chattering problem, hogging out first with a roughing pass is surely a simple solution. I just liked the method to directly finish cut at full 3" depth because it saves me a tool change and a lot of machine time. Right now I can machine the inside and outside of this mold with barely visible tool marks (0.02" stepover) in less than 50 minutes.
I have now changed the program with a weird double waterline strategy where on each z-level of such deep slots the bit first machines a loop at a small distance away from the intended surface to create clearance Then it does another loop on the target path. The clearance will hopefully avoid the slot wall bouncing. Of course that also takes longer but is only required for the mostly vertical wall sections. I will try that next couple of days.
Senior Member
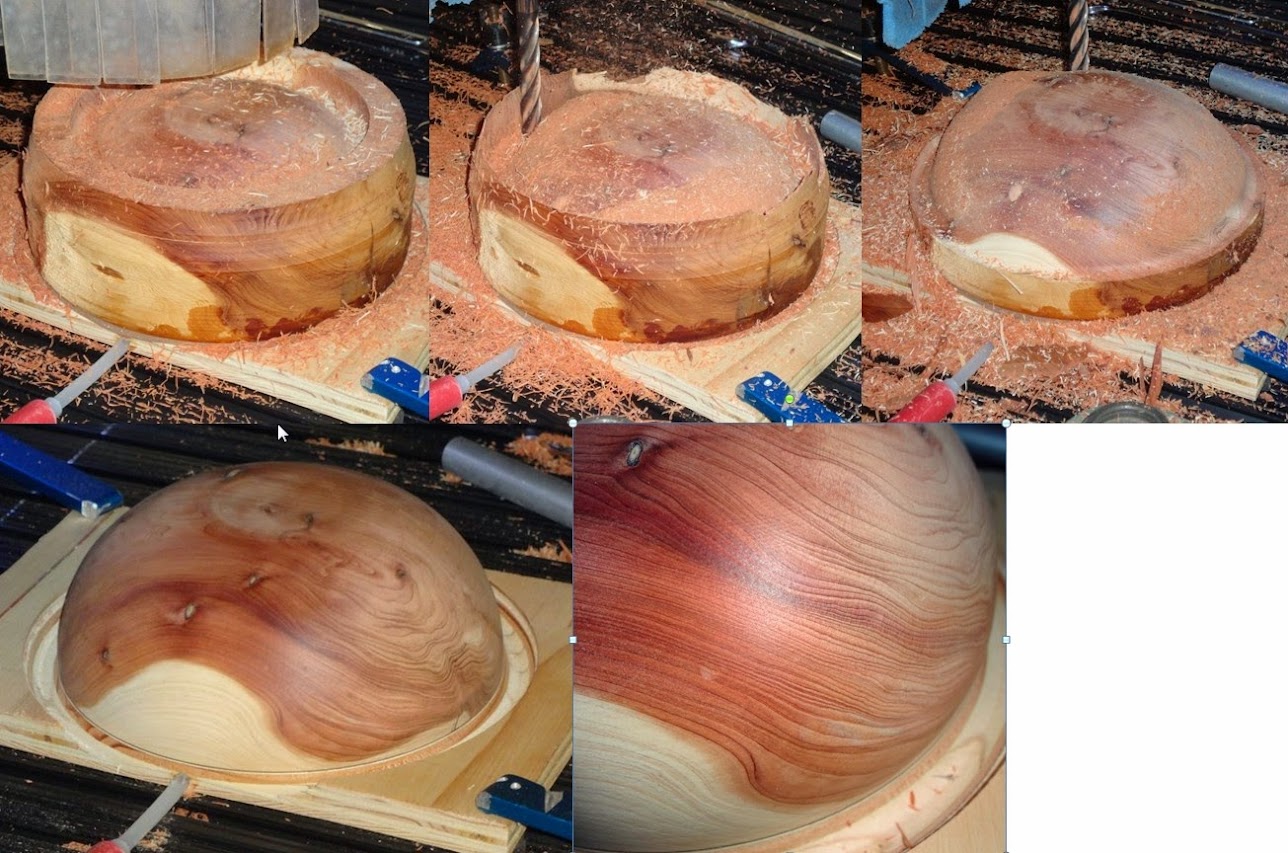
The slot clearance method did the trick. I made another bowl from a Juniper/Red cedar blank and that came out very clean. You may see I am working on Christmas presents, too.
This time I went with only 0.008" stepover which made for a quite long machine time (about 90 minutes each side) but now I just need to buff it with some 600 grit or x-fine steel wool. Otherwise it is good to finish as it comes from the machine. You have to look with a magnifier to see the bit traces. Wall thickness is only 3/16" and aligning inside with outside cut took me a while to figure out. The size is 8" diameter x 2.8" deep.
Inside cut (1/2" 4-flute ballnose, 3ips, 9000 rpm)
Outside cut (same bit and speed)
Senior Member
Hey G. , Looks like you have it dialed in!
Virtual "No Sand" finish is perfect cut in my book and maybe others in non-production shops.
Thinned CA i see in Pic? Was it soft or cracked?
REALLY like how you're making your own Excelsior for a display pillow/closet sachet!
scott
scott P.
2013 Desktop/spindle/VCP 11.5**
Maine
 Posting Permissions

 Reply With Quote