Page 1 of 4 123 ... LastLast
Results 1 to 10 of 40

Thread: Need Some V-Carve Advice

  1. #1
    Join Date
    Jun 2013
    Location
    Pasadena, CA
    Posts
    986

    Default Need Some V-Carve Advice

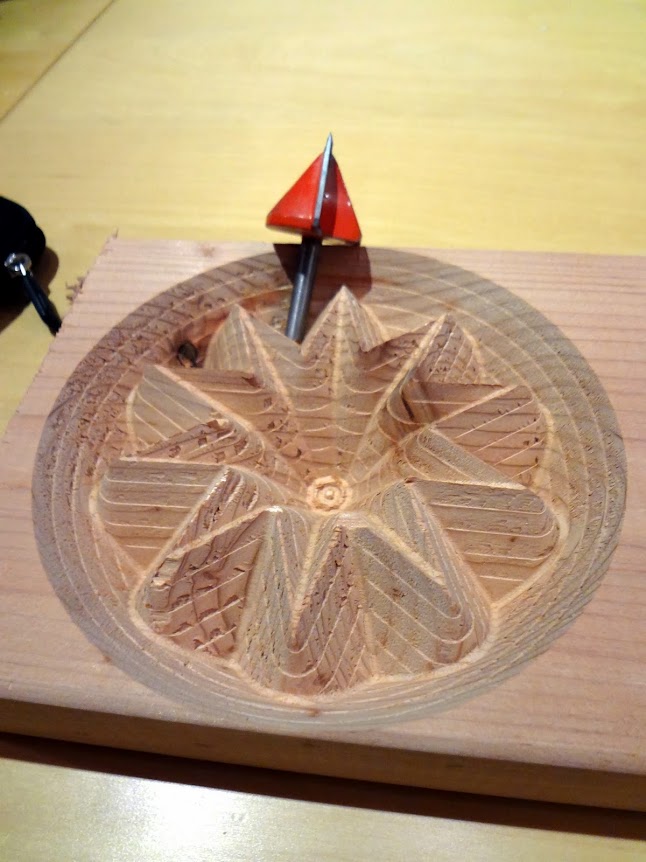
    I have not used my machine for V-carving much but tried a couple of things lately. But, like mentioned by somebody else in the recent "messy steps" thread the results vary. I did a comparison test today with several 60-degree bits I had around. Please see the bit description below. All cuts were made in Con Heart redwood, which cuts cleanly but is a bit sensitive to tear-out. Feed rate 80 ipm (1.33 ips) at 14,000 rpm and 0.2" depth steps. Obviously the Amana blade has by far the best result in spite (or maybe because) of the broken tip. I would appreciate an opinion on the results and other suggestions. I know, e.g. the Whiteside bits are quite popular but I did not have one to test. All cuts are as they come from the machine, no sanding.

    The Good: Amana In-Groove. Quite new but I ruined the tip when I tried to run it in maple at 120 ipm. Has only one cutting edge but can not run much faster than 15,000 rpm on my machine due to unbalance.


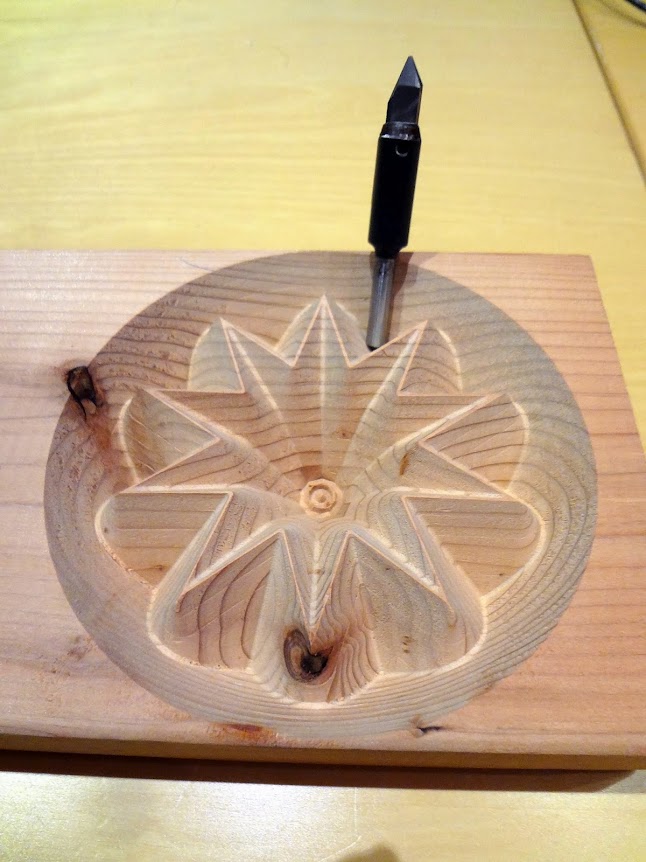
    Still O.K.: new 2-flute Kyocera engraving bit 1/4". Very sharp but the tip leaves some depth step. It is only a few 1/1000", barely perceptible with the fingernail but still quite visible.


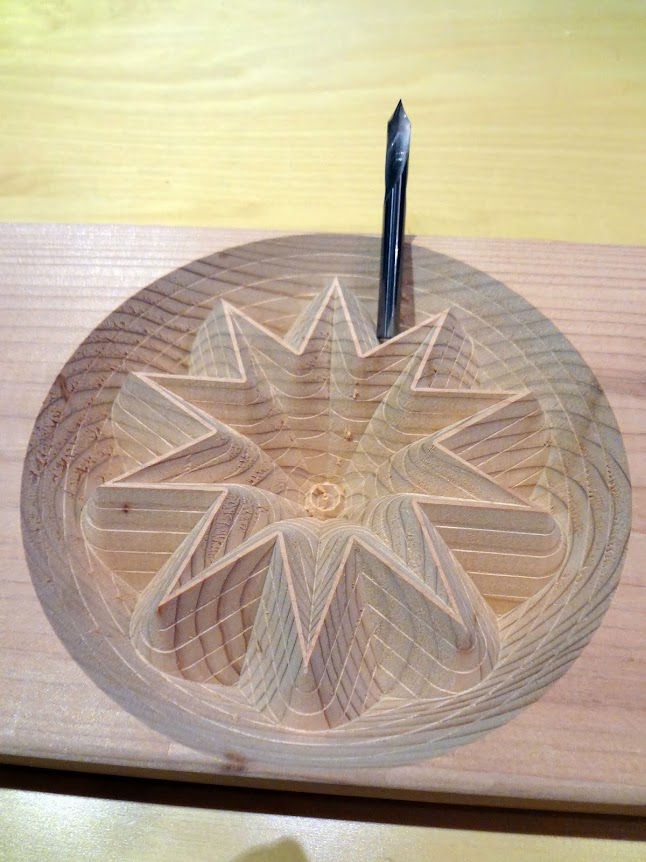
    The Bad: same Kyocera bit but I thought to "improve" the tip with a diamond hone.....much more tear-out. Maybe I should just blunt the tip completely (like the Amana)


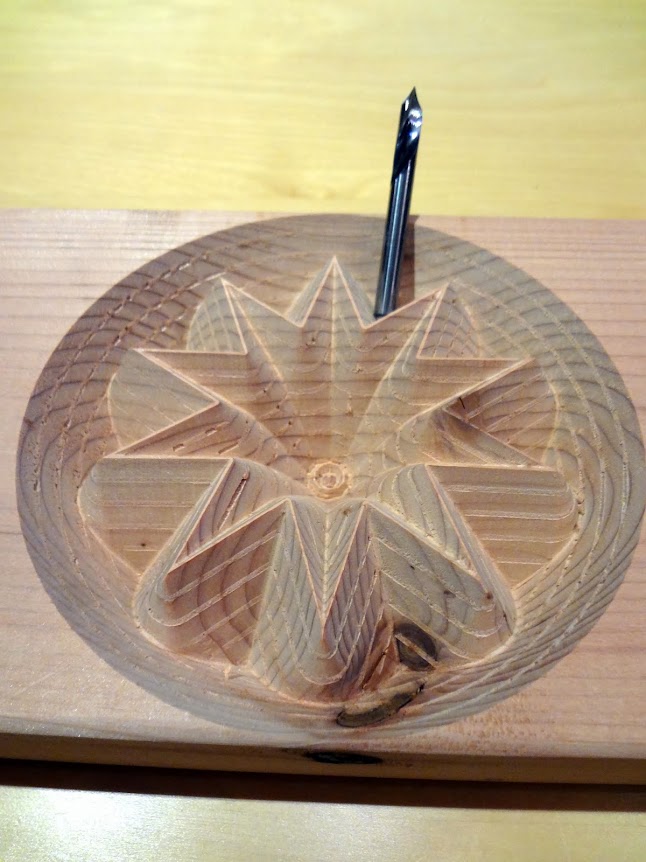
    And the Ugly: 1.25" V-bit from some eBay seller. I have used this bit already for several jobs and mostly the result looks better.

  2. #2
    Join Date
    Mar 2006
    Posts
    7,832

    Default

    you might want to check out centuriontools. I've been using mine for several years and they stay sharp.
    Attached Images Attached Images
    Words of Wisdom:
    “Words that sink into your ears are whispered…… not yelled”
    “The biggest trouble maker you’ll probably ever have to deal with, watches you from the mirror every morn’n”
    “The only difference between a rut and a grave is the depth”
    -----------
    Just remember...when it's time for the hearse to pull up..there's no luggage rack on top!
    -----------
    The beauty of the Second Amendment is that it will not be needed until they try to take it...Thomas Jefferson

  3. #3
    Join Date
    Sep 2006
    Location
    Garland Tx
    Posts
    2,334

    Default

    Gert…
    I’m happiest with the CMT 3 flute laser point bit…

    SG
    Attached Images Attached Images

  4. #4
    Join Date
    Apr 2013
    Location
    Kennebunkport, Maine
    Posts
    4,424

    Default

    G., I only do teeny stuff, but the deepest cut in this pic is .37" and the step on the bit is only .06 (.1245 60degree) and that cut is still on the table untouched. Funny it isn't even a vbit- its a 60 degree SC countersink with a .005" flat. Your broken amana was the best by far-I'd lose the Kyocera. Oh. cherry 1.2,.5,13K. Hope other people chime in on 1/4" 60's with pics
    Attached Images Attached Images
    • File Type: jpg G.jpg (48.5 KB, 337 views)
    scott P.
    2013 Desktop/spindle/VCP 12.0*
    Maine

  5. #5
    Join Date
    Jan 2004
    Location
    iBILD Solutions - Southern NJ
    Posts
    7,986

    Default

    I've only had precise results from Gerber and Amana insert bits (not in-groove). They are the only large diameter bits with properly ground angles that I have found over the years. Neither are cheap, but then again you see what you get with bits like the Ebay cheapie.

    With any insert bit you have to be very conservative with stepdown. I wasted a 45 deg Amana in maple when the insert got yanked out of the holder and now it is completely junk...apparently they are not designed to cut maple 1/2" deep in one go...total brainfart...it happens to the best of us some days.

    ANY v-shaped tool scrapes at the very point. Knocking off the tip will help cutting, but you won't get sharp prismatic corners and features that v-carving is known for. When v-carving is done properly, you should be able to stand back from it looking dead on & not be able to tell if it is prismatic or incised. It grabs your attention and makes you look twice.

    If you are getting step down marks in your v-carving, it is telling you that your tool diameter is too small. You are going to get some lines anytime you have a stepdown in the finish surface. A large dia tool that can do the cleanup pass in one go will not show these lines. I have Gerber and Freud v-bits up to 2" in dia. These are mostly for HDU signs, but on occasion a 2" 90 is nice for doing 45s on dimensional lumber and other things.

    The smaller bits already mentioned are great for smaller letters and designs, but once you start to carve larger designs and letters, you need larger diameter tools to get the quality of cut you are after.

    -B
    High Definition 3D Laser Scanning Services - Advanced ShopBot CNC Training and Consultation - Vectric Custom Video Training IBILD.com

  6. #6
    Join Date
    Nov 2013
    Location
    Nairobi, Kenya
    Posts
    34

    Default

    Hi G.,

    If i'm doing V-carve (chipcarving) work with a tool that cannot complete the design in one pass I always grind the tip to a radius ball point between 1mm-2mm diameter. The greater the radius of the rounded tip the less obvious the stepping is. The only draw-back to that is that the greater the radius the less sharp your corner edges will be. Depending on the scale of the pattern, I would decide on the maximum tip radius that would still give relatively good 'chipcarved' looking work. The larger the work the less perceptible unsharp corners are. I find that you can only tell that a corner isn't sharp if you use a 1.5mm diameter and look really close.

    My rule of thumb is:

    work with elements less than 10mm - usually done in one pass
    work with elements 10-20mm - ~1mm diameter
    work with elements 20-35mm - ~1.5mm diameter
    work with elements 35mm and larger - 2mm diameter

    I'll sometimes change these values depending on the angle of the bit and the hardness of the wood.

    For really large work I'll just use my 1" Onsrud 60deg tool that I ground the tip to a 1mm Diameter.

    Using these I find that it leaves a super clean edge that requires no further sanding. I'm suspecting you're still getting lines per pass coz the flat tip still has a sharp edge rather than a rounded edge.


    Some further tips I follow-

    -Use the hardest timber available (holds a better edge and less prone to chipping and splintering

    - if you can do a cut in one pass - use a conservative plunge rate and feedrate (more conservative for harder wood)

    - try not to let two vcut overlap (you could get chipping off the top edge that ends up looking horrible). I try to leave a 0.5-1mm gap at the top. Looks like you've done the same in your photos.

    - use a cutter whose cutter geometry is centred. i.e. if you look at the top of the cutter, the cutting edges on opposing sides (or all cutter edges if using one with more than two flutes) must meet dead centre, and not be offset from the true centre (learned this one from you on the 'messy v-groove' thread ). These kinds of cutters are usually the 'carbide tipped' type, you unfortunately can't correct this issue by grinding. I would only use these tools for single pass work.

    - use a sharp cutter

    - try as much as possible to do all cuts in one pass.


    Hope the info helps.

    Done alot of v-groove cutting and learnt some of the above the hard way.

    Mark

  7. #7
    Join Date
    Jun 2013
    Location
    Pasadena, CA
    Posts
    986

    Default

    Thanks guys, great information!

    I will order the CMT bit for comparison and maybe the Whiteside, too and keep experimenting, also with rounding of the anyway broken tip. The big Amana insert bit is a bit "rich" for me at this time

    Did anybody try a roughing/finishing method with a very big bit? That would be doing a first high speed removal of the bulk material in reasonable depth steps running the path maybe 20 or 40/1000" high and then a single slower pass at full depth and correct starting level to skim the depth marks and create the final shape.

  8. #8
    Join Date
    Jan 2004
    Location
    iBILD Solutions - Southern NJ
    Posts
    7,986

    Default

    That's a 'trick' that many of us have done - drop the Z down .01 deeper and clean it up in one go.

    -B
    High Definition 3D Laser Scanning Services - Advanced ShopBot CNC Training and Consultation - Vectric Custom Video Training IBILD.com

  9. #9
    Join Date
    Feb 2004
    Location
    Sawdust and Noise, Brampton Ontario
    Posts
    110

    Default

    From the steps on the side of the carving it looks like only the Amana is actually 60 degrees, everything else is not.

  10. #10
    Join Date
    Oct 2009
    Location
    Elgin Illinois
    Posts
    706

    Default

    Hello Gert. Thanks for publishing the side by side comparison photos. I always find such evaluations to be very enlightening, and I think they are a great public service.

    First, let me say that I too purchased the Amana "In-Groove" tool, as part of their 8 piece packaged set. And like you, I too had my tip break off really fast, while I was still cutting the first piece, which was only MDF, at 1.5IPS, and it was a shallow cut making small letters. Before breaking, the grooves were awesome! After breaking, just as in your case, the side walls were still beautiful (no real consolation though, as I wanted a sharp bottom in my grooves). That set came with 4 sharply pointed tips. All broke with almost no use, only cutting MDF. (I did call Txxxx Txxxx, where I bought these and complained, and they referred me to Amana's tech support, and after one try of being on hold, I simply didn't bother again) I figure it is best to let people know about these bad tools, so that they can either avoid buying them, or at least not feel like they are stupid and have messed something up by doing something dumb.

    I too had some other cheapie conventional V bits I had purchased brand new, and I too had poor results, in poor bottom of groove definition, but not with the sidewalls, because my cuts were so shallow (again, just small letters, then some art type engravings), I did them in one pass. But when I complained on this forum, and asked for suggestions, the CMT Laser point bits were recommended by a couple of people, perhaps Steve G. was one of them. But I have had great success using 60 degree three wing CMT Laser bits.


    I look forward to your future pictures showing how well your CMT Laser bit works. Good luck, Chuck
    Chuck Keysor (circa 1956)
    PRT Alpha 60" x 144" (circa 2004)
    Columbo 5HP spindle
    Aspire 9.0, Rhino 5

Similar Threads

  1. v-carve ??
    By capj209 in forum Troubleshooting
    Replies: 4
    Last Post: 07-13-2015, 04:44 PM
  2. My first V-Carve and texture carve
    By PNast in forum Folder 2013
    Replies: 3
    Last Post: 05-28-2013, 08:51 AM
  3. Advice on preparing line art for inlay or v-carve....
    By john_l in forum ShopBotter Message Board
    Replies: 25
    Last Post: 01-14-2010, 09:01 AM
  4. I'm new to v-carve need a little help!
    By thomas_bass in forum VCarvePro and PhotoVCarve
    Replies: 5
    Last Post: 04-20-2009, 01:27 PM
  5. V-Carve
    By signarama in forum Archives2006
    Replies: 1
    Last Post: 03-16-2006, 11:20 AM

Posting Permissions

  • You may not post new threads
  • You may not post replies
  • You may not post attachments
  • You may not edit your posts
  •